
How to Threat Model a QR Code Payment System (Use Case 1)
A step-by-step guide to identifying trust boundaries, attack surfaces, and defense-in-depth strategies for a real-world payment system.
Collaborating with Claude
Threat modeling is one of the most valuable skills a security engineer can have. It’s not about memorizing vulnerability lists — it’s about systematically thinking through how a system can be attacked and building layered defenses.
In this post, I’ll walk through a complete threat model of a QR code payment system — the kind of system companies like Meta, PayPal, or Square might build. We’ll cover the full framework: system decomposition, trust boundaries, attack surfaces, priority threats, and defense-in-depth mitigations.
The goal of threat modeling isn’t to find every possible vulnerability. It’s to understand what you’re protecting, who might attack it, and where your defenses are weakest.
The System: QR Code Payments
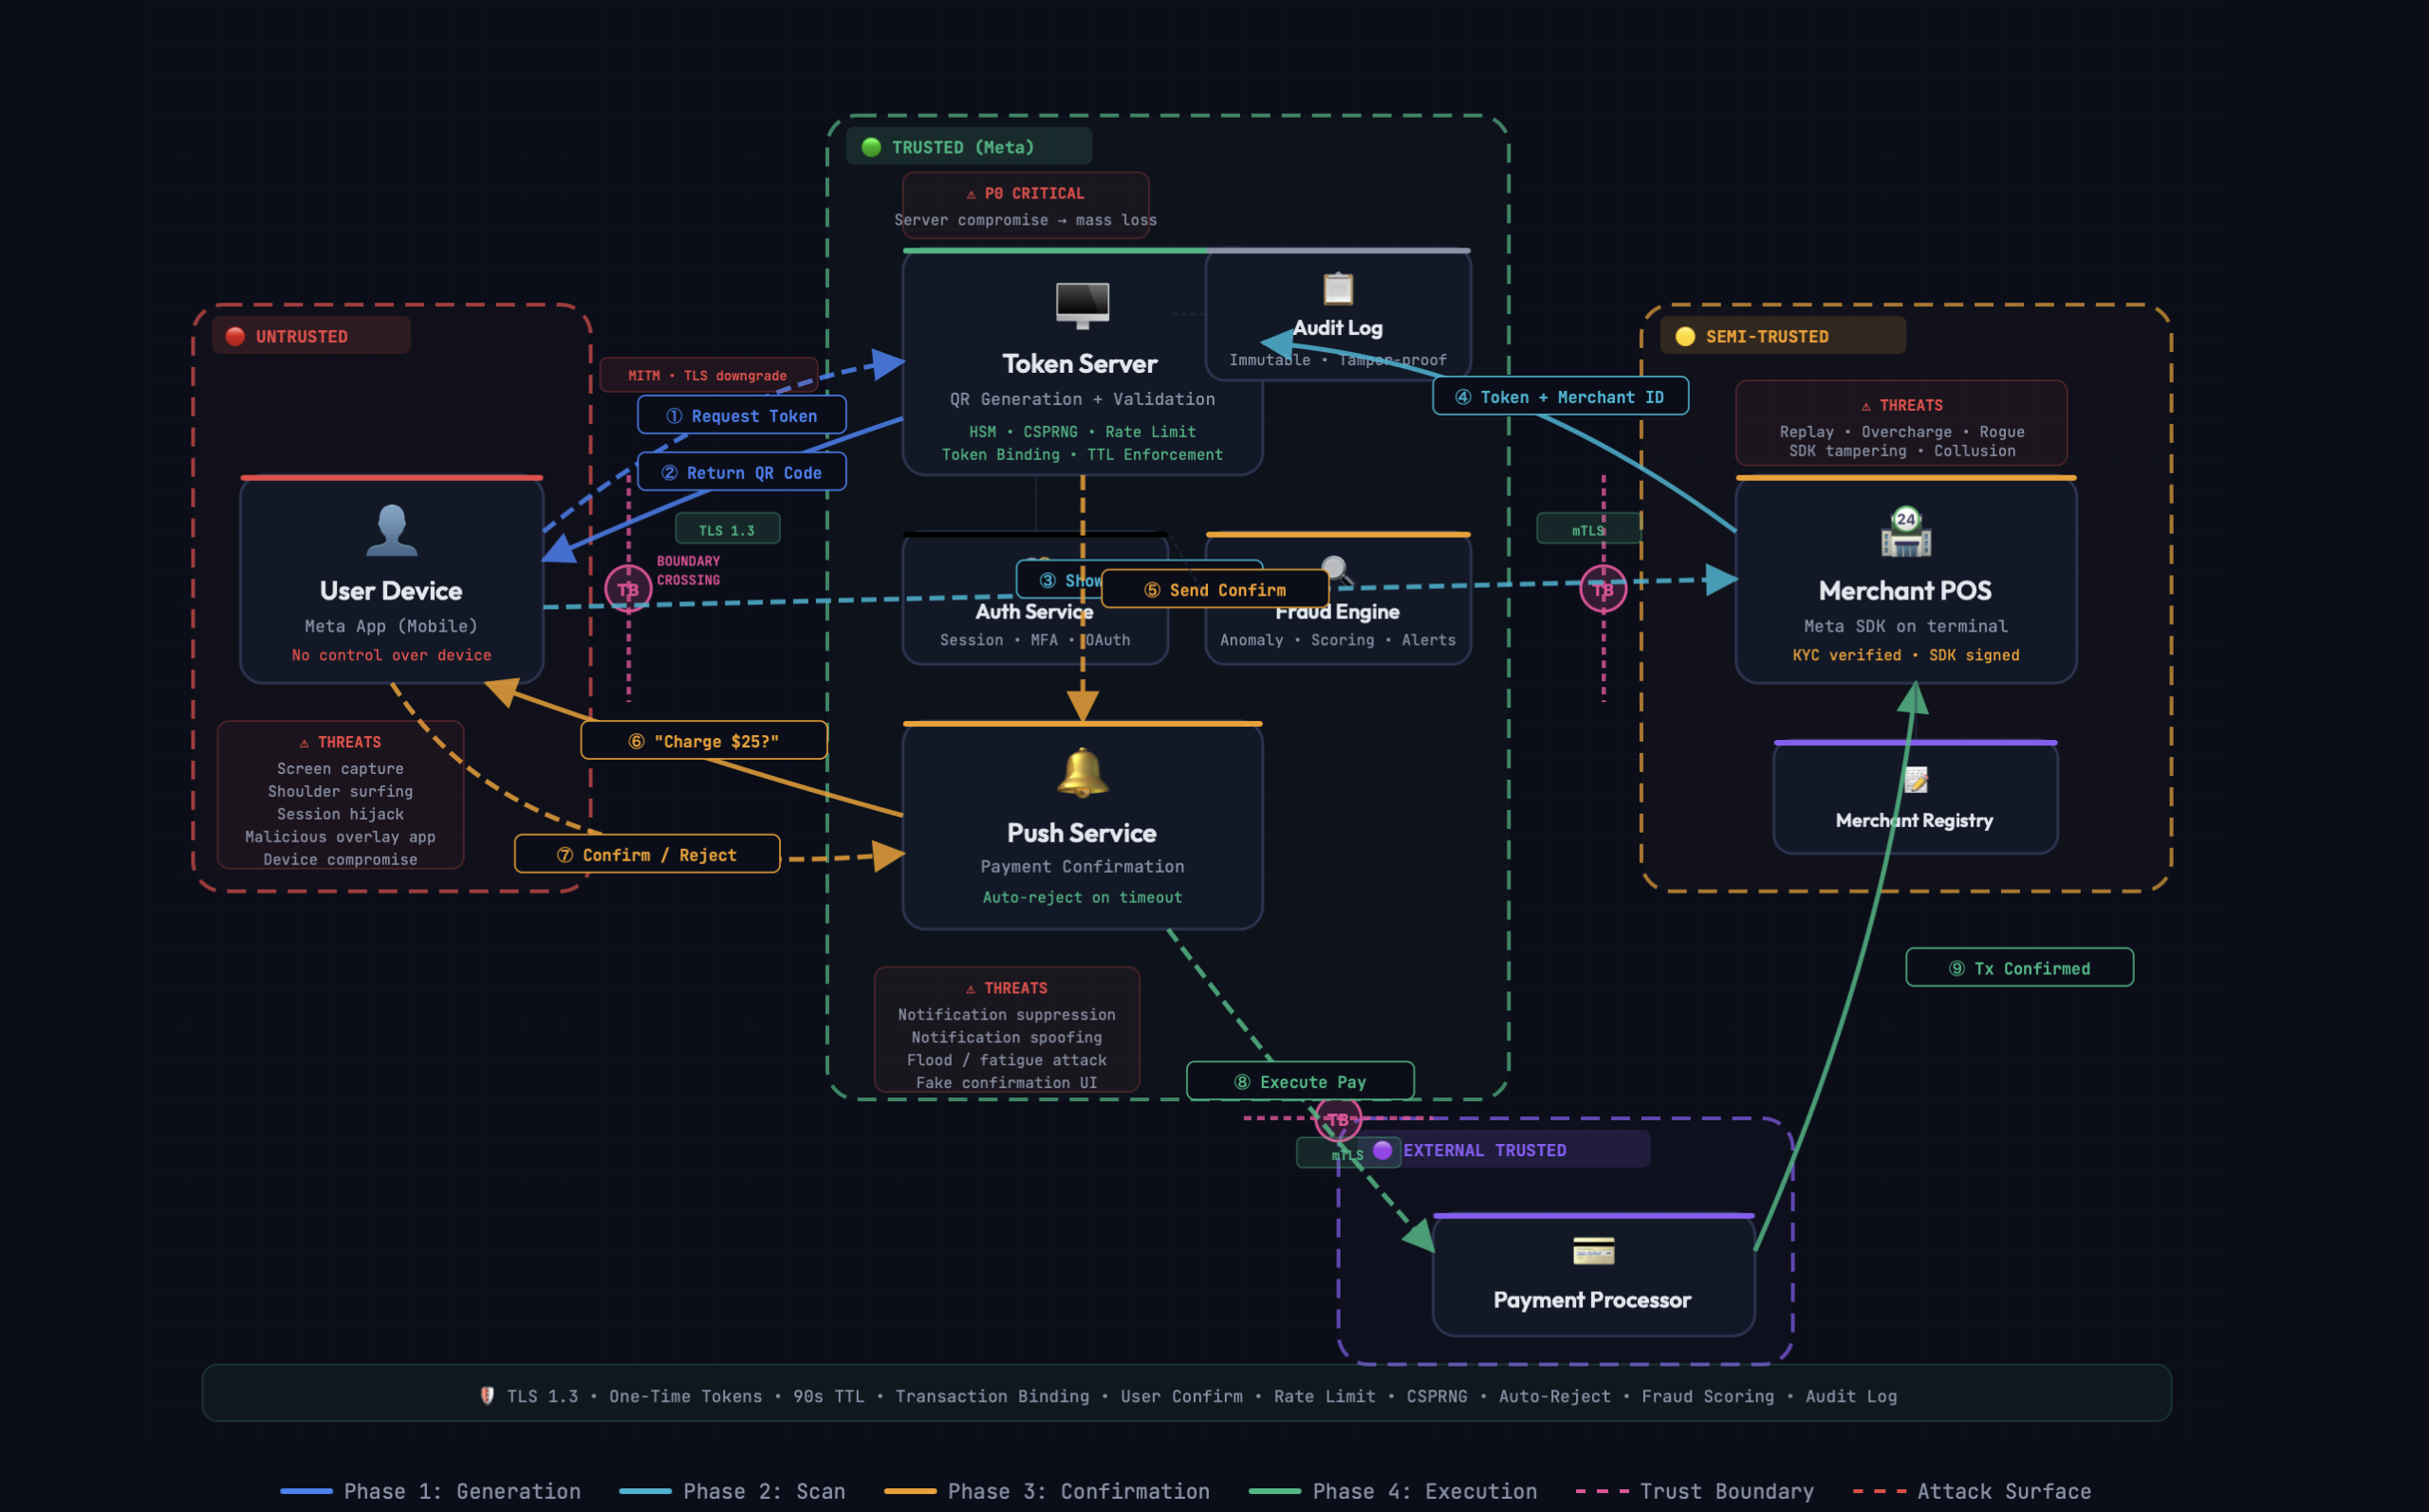
Here’s the system we’re modeling: a user opens a mobile app, generates a QR code linked to their payment account, and a merchant scans it to charge them. Simple in concept, complex in security.
System Components:
👤 User (Mobile App) → 🖥️ Token Server (QR Generator) → 🔔 Push Service (Confirmation) → 🏪 Merchant (POS Terminal) → 💳 Payment ProcessorThe payment process has four distinct phases:
Phase 1: 🔑 Token Generation
- User opens app (authenticated session)
- App requests QR code from server
- Server generates one-time token using CSPRNG
- Token bound to user_id and device fingerprint
- QR code returned with 90-second TTL
Phase 2: 📱 Merchant Scan
- User displays QR code on screen
- Merchant scans with POS terminal
- Token and merchant_id sent to server
- Server validates: not expired, not used
- Token bound to this specific merchant
Phase 3: ✅ User Confirmation
- Merchant enters charge amount
- Server sends push notification to user
- User sees: “Store X wants to charge $25.00”
- User confirms or rejects
- No response within timeout → auto-reject
Phase 4: 💰 Payment Execution
- If confirmed → payment processor executes charge
- If rejected or timeout → transaction cancelled
- Token invalidated permanently in all cases
- Receipt sent to both user and merchant
- Transaction logged for audit
Step 1: Define Trust Boundaries
Trust boundaries are the most important concept in threat modeling. A trust boundary is where the level of trust changes — where data moves from a zone you control to one you don’t (or vice versa). Attacks almost always happen at boundary crossings.
Our system has four distinct trust zones:
🔴 UNTRUSTED — User Device
We have zero control. Could be rooted, running malware, or capturing screenshots. All data from this zone must be validated.
🟡 SEMI-TRUSTED — Merchant
KYC-verified and using our SDK, but we don’t control their hardware. They could tamper with the SDK or attempt replay attacks.
🟢 TRUSTED — Our Servers
Token server, auth, fraud engine, push service, audit logs. We control this environment. Defense in depth still applies internally.
🟣 EXTERNAL TRUSTED — Payment Processor
Third-party (Stripe, Adyen). Trusted via contract and mTLS, but we can’t control their internal security posture.
💡 Key Insight: Every arrow in the architecture diagram that crosses a trust boundary is a potential attack surface. Focus your security analysis on the transitions between trust zones, not just on individual components.
Boundary Crossings: Where Attacks Happen
There are three critical boundary crossings in this system. Each one represents a point where data moves between trust zones and must be validated, authenticated, and protected.
USER ↔ SERVER (Steps ①②⑦) User device sends/receives sensitive data across untrusted network to our servers.
- Threats:
MITMSession theftToken interception - Defenses:
TLS 1.3Cert pinningDevice binding
MERCHANT ↔ SERVER (Steps ④⑨) Merchant POS sends scanned token and receives transaction results through semi-trusted channel.
- Threats:
Replay attackSDK tamperingAmount manipulation - Defenses:
Mutual TLSSDK integrityTransaction binding
SERVER ↔ PAYMENT (Step ⑧) Our server sends payment execution requests to external processor with user’s financial details.
- Threats:
Double chargeAmount mismatchProcessor outage - Defenses:
Mutual TLSIdempotency keysAmount re-verify
Step 2: Identify Assets
Before listing threats, we need to know what we’re protecting. Assets aren’t just data — they’re anything of value that an attacker might target.
- User’s money — the ultimate target. Every attack eventually aims here.
- QR code token — a reference to the user’s payment account. If stolen or predicted, an attacker can initiate unauthorized charges.
- Token generation system — the server that creates QR codes. If compromised, an attacker can generate tokens for any user.
- Push notification channel — the user’s only chance to reject a charge. If suppressed or spoofed, users lose their safety net.
- Transaction data — payment history, amounts, merchant relationships. Privacy-sensitive.
- Merchant credentials — SDK keys that authenticate merchants. If stolen, attackers can impersonate legitimate merchants.
- User session — if hijacked, the attacker can generate QR codes as the victim.
Step 3: Enumerate Threats
Now we systematically identify threats at each component and boundary crossing, focusing on the most impactful scenarios.
| Threat | Severity | Attack Vector | Impact |
|---|---|---|---|
| Token Server Compromise | 🔴 P0 CRITICAL | Attacker gains access to token generation system | Generate tokens for any user → mass financial loss |
| QR Code Replay | 🔴 P0 CRITICAL | Merchant captures token, replays for multiple charges | User charged multiple times for single transaction |
| Push Notification Compromise | 🟠 P1 HIGH | Suppress, spoof, or flood notifications | Unauthorized charges go undetected |
| Token Prediction | 🔴 P0 CRITICAL | Weak RNG allows predicting future tokens | Forge tokens without server access |
| QR Code Interception | 🟠 P1 HIGH | Screen capture, shoulder surfing, malicious overlay | Stolen token used at different merchant |
| Amount Tampering | 🟠 P1 HIGH | Malicious merchant modifies charge amount | User charged more than approved |
| Notification Fatigue | 🟡 P2 MEDIUM | Flood user with small charge requests | User approves without reading |
Step 4: Token Binding — The Core Defense
The most important security mechanism in this system is token binding. Rather than creating a generic token that works anywhere, we progressively bind the token to specific attributes at each phase.
json
// Server-side token object — bound progressively
{
  "token":              "qr_7f3a9b2c...",        // CSPRNG generated
  "user_id":            "user_456",              // bound at generation
  "device_fingerprint": "d8a9f2e1...",           // bound at generation
  "merchant_id":        "merchant_789",          // bound at scan
  "amount":             25.00,                   // set by merchant, confirmed by user
  "created_at":         "2026-02-27T14:30:00Z",
  "expires_at":         "2026-02-27T14:31:30Z",  // 90 second TTL
  "status":             "pending",               // → used → expired
  "single_use":         true                     // invalidated after first use
}
With full transaction binding, even if a token is intercepted, the attacker can’t use it at a different merchant, can’t change the amount, and can’t replay it after it’s been used. Each constraint eliminates an entire class of attacks.
Step 5: Defense in Depth
No single security control is sufficient. If one layer fails, the next layer should catch the attack. Here’s how defenses are layered across the system:
🔐 Token Security CSPRNG for unpredictable generation. One-time use. 90-second TTL. Server-side invalidation on any outcome — confirm, reject, or timeout.
🧱 Transaction Binding Token progressively locked to user_id, device fingerprint, merchant_id, and amount. Prevents cross-merchant replay and amount tampering.
👤 User Confirmation Explicit approve/reject for every charge. In-app verification, not just push notification. Auto-reject on timeout. Biometric for high amounts.
📊 Rate Limiting Per-user, per-merchant, per-token rate limits. Prevents replay attempts and notification flooding. Anomaly detection on patterns.
🔍 Fraud Detection Real-time scoring on transaction patterns. Flag unusual amounts, frequencies, locations, or merchant behaviors. Automated holds on suspicious activity.
🌐 Transport Security TLS 1.3 for all communications. Certificate pinning on mobile app. Mutual TLS for merchant SDK and payment processor connections.
✅ Defense in Depth in Action: Consider a replay attack: the one-time token stops it at layer 1. If that somehow fails, the TTL stops it at layer 2. If both fail, the user confirmation catches it at layer 3. If the user isn’t paying attention, rate limiting blocks rapid replays at layer 4. And the fraud engine catches any anomalous patterns at layer 5.
Five independent layers must all fail for the attack to succeed. That’s defense in depth.
Step 6: The Push Notification Blind Spot
One often-overlooked attack surface is the push notification channel. The user confirmation is the last line of defense before payment execution. If an attacker can compromise this channel, the entire security model weakens.
Three specific attacks target this channel:
⚠ Notification Suppression
If an attacker blocks the push notification from reaching the user, the user never sees the charge request. The system must never auto-approve on timeout — silence must always mean rejection.
⚠ Notification Spoofing
On a compromised device, a malicious app could fake the notification UI to show “$5.00” when the actual charge is “$500.00.” The confirmation must happen inside the app, not just through the notification, with the amount fetched directly from the server.
⚠ Notification Flooding
Sending dozens of small charge requests causes notification fatigue — users start approving without reading. Rate limiting per user prevents this, capping how many pending charges can exist simultaneously.
The Threat Modeling Framework
The specific QR code system is just an example. The framework is universal. You can apply this same process to any system:
- Decompose the system — identify all components and how data flows between them.
- Draw trust boundaries — determine what you control, partially control, and don’t control at all.
- Identify assets — what are you protecting? Follow the money, the data, and the trust.
- Enumerate threats — at every boundary crossing and for every asset, ask: who would attack this, how, and why?
- Prioritize — not all threats are equal. Focus on the most likely and most impactful.
- Design mitigations — layer your defenses so no single failure is catastrophic.
Security isn’t about building a perfect wall. It’s about building enough walls that an attacker runs out of resources before they run out of walls.
Key Takeaways
📌 Remember These Principles:
- Trust boundaries are where attacks happen. Focus your security analysis on boundary crossings, not just individual components.
- Token binding eliminates entire attack classes. The more attributes you bind to a token, the narrower the attacker’s options become.
- Never auto-approve on silence. In payment systems, timeout must always mean rejection.
- Defense in depth is not optional. Every control will fail eventually. The question is whether your next layer catches it.
- Think like an attacker, build like an engineer. Creative offense informs disciplined defense.
Written as part of a security engineering interview preparation series. Feedback and discussions welcome.